
Add Domain to MailBreeze
Log into your MailBreeze account and navigate to Domains to add a new domain. After entering your domain, you’ll see the DNS Setup screen with all required records.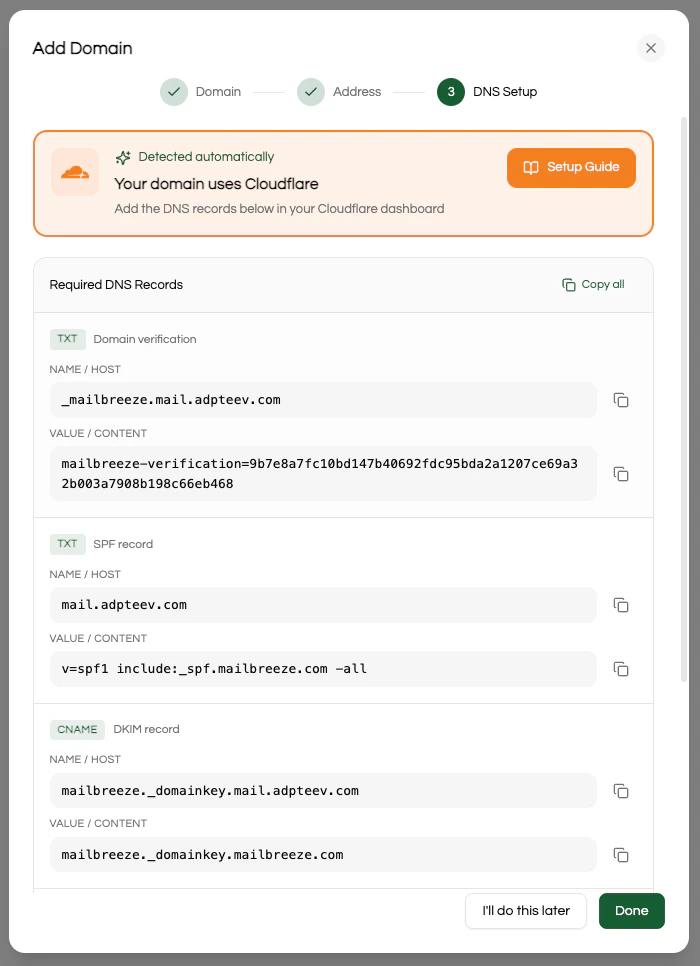
Use a subdomain (e.g.,
mail.example.com) instead of your root domain (example.com). This keeps your transactional email reputation separate from your corporate email. If your sending domain ever gets blacklisted, your main business email (Google Workspace, Microsoft 365, etc.) remains unaffected.Domain Setup Page
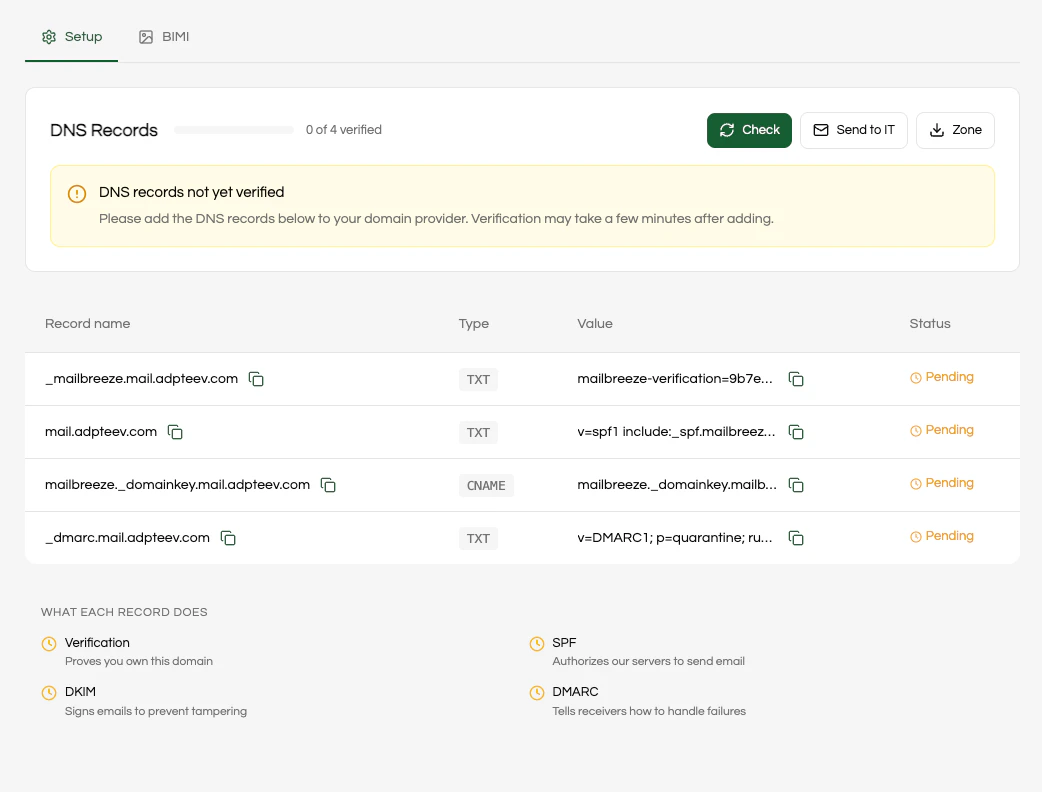
After adding your domain, you can access the setup page anytime from Domains in your dashboard. Here you can:- Click Check to verify your DNS records
- Click Send to IT to email the DNS details to your IT team
- Click Zone to download the zone file for import
Import DNS Zone File
The easiest way to configure your DNS records is to import the zone file directly. Most DNS providers support zone file imports.1
Download Zone File
On the domain setup page, click Zone to download the DNS zone file.
2
Import to Your DNS Provider
In your DNS provider’s dashboard, look for an Import or Import Zone File option and upload the file you downloaded from MailBreeze.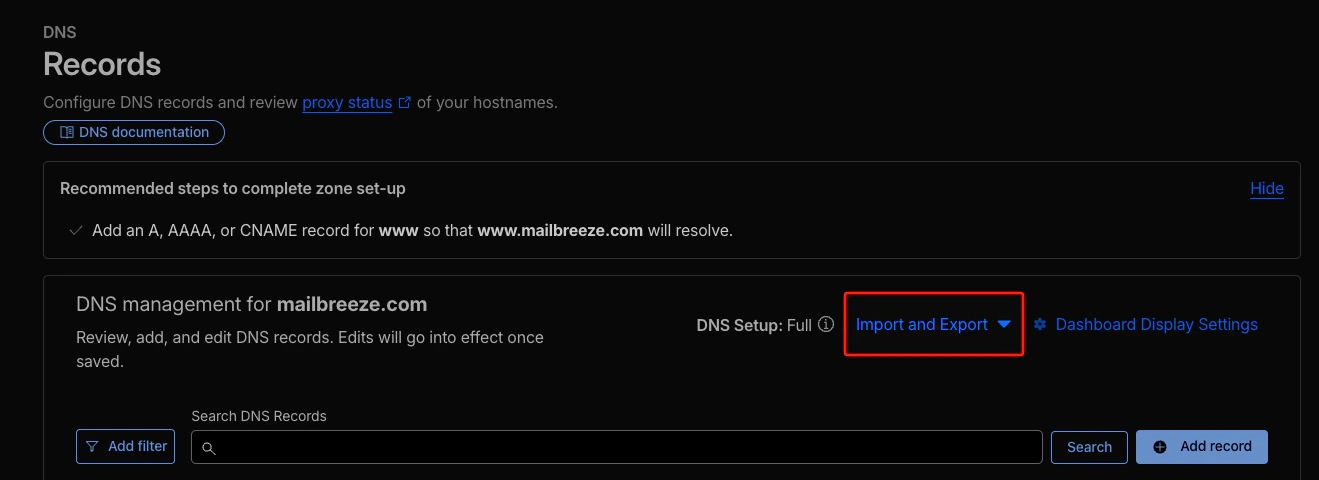
The screenshot above shows Cloudflare, but most DNS providers have a similar import option in their DNS settings.
3
Verify Your Records
Before clicking Check in MailBreeze, verify your records are live using MXToolbox DNS Lookup. This helps catch any issues before verification fails.
4
Complete Verification
Return to your MailBreeze dashboard and click Check to verify your DNS records.
Manual Setup
If you prefer to add records manually or your DNS provider doesn’t support zone file imports, follow these steps. You’ll need to add 4 records:Provider-Specific Notes
Cloudflare
Cloudflare
All DNS records must have proxy status set to DNS only (gray cloud icon). Orange cloud (proxied) will cause verification to fail.
GoDaddy
GoDaddy
GoDaddy automatically appends your domain to the Name field. If MailBreeze shows
_mailbreeze.mail.example.com, enter only _mailbreeze.mail in GoDaddy.AWS Route 53
AWS Route 53
TXT record values must be wrapped in quotes. For example:
"v=spf1 include:_spf.mailbreeze.com -all"Namecheap
Namecheap
Use
@ for root domain records. Namecheap automatically appends your domain, so enter only the subdomain portion in the Host field.Add Your Records
1
Open Your DNS Provider
Log in to your DNS provider and navigate to the DNS management page for your domain.
2
Add Verification Record
Add a TXT record to verify domain ownership.
The verification value will look like:
3
Add SPF Record
Add a TXT record for SPF authentication. This authorizes MailBreeze servers to send email on your behalf.
The SPF value will look like:
4
Add DKIM Record
Add a CNAME record for DKIM authentication. DKIM cryptographically signs your emails to prove they haven’t been tampered with.
The DKIM target will look like:
5
Add DMARC Record
Add a TXT record for DMARC (Domain-based Message Authentication, Reporting, and Conformance). This tells receiving mail servers what to do when emails fail SPF or DKIM checks.
The DMARC value will look like:
Understanding DMARC policy: MailBreeze sets
p=quarantine by default, which tells receiving servers to send suspicious emails to spam rather than rejecting them outright. This protects your deliverability while you’re building sender reputation. The rua and ruf parameters send DMARC reports to MailBreeze so we can monitor your domain’s authentication health.6
Verify Your Records
Before clicking Check in MailBreeze, verify your records are live using MXToolbox DNS Lookup. Enter your full record name (e.g.,
_mailbreeze.mail.example.com) and confirm the values match what MailBreeze expects.7
Complete Verification
Return to your MailBreeze dashboard and click Check to verify your DNS records. DNS propagation typically completes within a few minutes, but can take up to 72 hours in some cases.
After Verification
Once all 4 records show as verified, your domain is ready to send. You can:- Send your first email using the API
- Set up an SDK in your preferred language
- Configure sender addresses in your dashboard
Troubleshooting
Verification Failed
Verification Failed
Double-check the following:
- Record values were copied exactly from MailBreeze (no extra spaces or missing characters)
- You entered only the subdomain portion if your provider auto-appends the domain
- TXT values are wrapped in quotes if your provider requires it (e.g., Route 53)
- You’re adding records to the correct domain/subdomain
Records Not Propagating
Records Not Propagating
DNS propagation usually takes 5-15 minutes but can take up to 72 hours. To check propagation status:
- Use MXToolbox or WhatsMyDNS to verify records are visible globally
- If records appear in these tools but MailBreeze still shows pending, wait a few minutes and click Check again
Cloudflare: Error Code 1004
Cloudflare: Error Code 1004
This error indicates DNS records are being proxied. In Cloudflare, click the orange cloud icon next to each record to change it to gray (DNS only).
Still Pending After 72 Hours
Still Pending After 72 Hours
If verification is still pending after 72 hours:
- Use MXToolbox to verify records are visible
- Compare the visible records against what MailBreeze expects
- Contact support@mailbreeze.com with your domain name and we’ll investigate