> ## Documentation Index
> Fetch the complete documentation index at: https://docs.mailbreeze.com/llms.txt
> Use this file to discover all available pages before exploring further.
# Enable Inbound Email
> Configure MX records to receive emails through MailBreeze
This guide walks you through enabling inbound email for your domain. The process requires adding an MX (Mail Exchanger) record to your DNS, which tells other mail servers to deliver emails for your domain to MailBreeze.
**Before you begin**: Enabling inbound email for a domain means MailBreeze will handle **all** incoming email for that domain. If you currently receive email through another provider (Google Workspace, Microsoft 365, Zoho Mail, etc.), those emails will stop being delivered to that provider.
We strongly recommend using a **subdomain** (e.g., `inbound.yourdomain.com`) for MailBreeze inbound email to keep your primary email unaffected.
## Prerequisites
Before enabling inbound email, ensure you have:
* A verified domain in MailBreeze (see [DNS Setup](/dns/setup))
* Access to your domain's DNS settings
* Understanding of whether your domain currently has MX records
**Check your current MX records** using [MXToolbox](https://mxtoolbox.com/MXLookup.aspx). Enter your domain and see what mail servers currently receive your email. If you see records pointing to Google (`aspmx.l.google.com`), Microsoft (`outlook.com`), or similar providers, you have existing email service.
## Start the Setup
1. Log into your MailBreeze dashboard at [console.mailbreeze.com](https://console.mailbreeze.com)
2. Navigate to **Domains** and select your verified domain
3. Click **Enable Inbound Email**
What happens next depends on whether your domain already has MX records.
***
## Scenario 1: Domain Has Existing MX Records
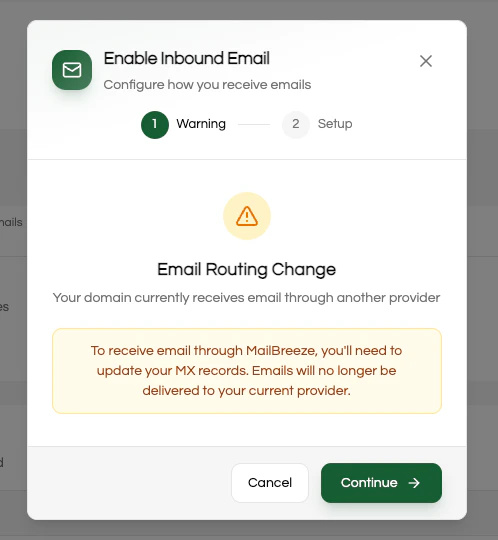
If MailBreeze detects that your domain already has MX records pointing to another email provider, you'll see a warning screen:
 ### Understanding the Warning
This warning appears because your domain is already configured to receive email through another provider. The warning indicates:
**Email Routing Change**
Your domain currently receives email through another provider. To receive email through MailBreeze, you'll need to update your MX records. **Emails will no longer be delivered to your current provider.**
**What this means in practice:**
* If you use Google Workspace for `team@yourdomain.com`, those emails will **stop** arriving in Gmail
* If you use Microsoft 365, emails will **stop** arriving in Outlook
* Any email addresses on this domain (support@, sales@, info@, personal@) will be affected
* This change affects **everyone** who receives email on this domain
### Should You Continue?
* You're using a **subdomain** specifically for MailBreeze (e.g., `inbound.yourdomain.com` or `mail.yourdomain.com`)
* You're **migrating away** from your current email provider entirely
* This domain is only used for **application email**, not human users
* You understand and accept that existing email service will stop
* People on your team rely on this domain for daily email (checking inbox, sending messages)
* You use Google Workspace, Microsoft 365, or another provider for business email
* You're unsure whether anyone else uses email on this domain
* You want to **keep** your existing email AND add MailBreeze inbound
**Recommended approach**: Create a subdomain like `inbound.yourdomain.com` and verify it in MailBreeze. Enable inbound email on the subdomain only. This keeps your primary domain's email (Google Workspace, Microsoft 365, etc.) completely unaffected.
### Continue with Setup
If you understand the implications and want to proceed, click **Continue**. You'll see the MX record configuration screen:
### Understanding the Warning
This warning appears because your domain is already configured to receive email through another provider. The warning indicates:
**Email Routing Change**
Your domain currently receives email through another provider. To receive email through MailBreeze, you'll need to update your MX records. **Emails will no longer be delivered to your current provider.**
**What this means in practice:**
* If you use Google Workspace for `team@yourdomain.com`, those emails will **stop** arriving in Gmail
* If you use Microsoft 365, emails will **stop** arriving in Outlook
* Any email addresses on this domain (support@, sales@, info@, personal@) will be affected
* This change affects **everyone** who receives email on this domain
### Should You Continue?
* You're using a **subdomain** specifically for MailBreeze (e.g., `inbound.yourdomain.com` or `mail.yourdomain.com`)
* You're **migrating away** from your current email provider entirely
* This domain is only used for **application email**, not human users
* You understand and accept that existing email service will stop
* People on your team rely on this domain for daily email (checking inbox, sending messages)
* You use Google Workspace, Microsoft 365, or another provider for business email
* You're unsure whether anyone else uses email on this domain
* You want to **keep** your existing email AND add MailBreeze inbound
**Recommended approach**: Create a subdomain like `inbound.yourdomain.com` and verify it in MailBreeze. Enable inbound email on the subdomain only. This keeps your primary domain's email (Google Workspace, Microsoft 365, etc.) completely unaffected.
### Continue with Setup
If you understand the implications and want to proceed, click **Continue**. You'll see the MX record configuration screen:
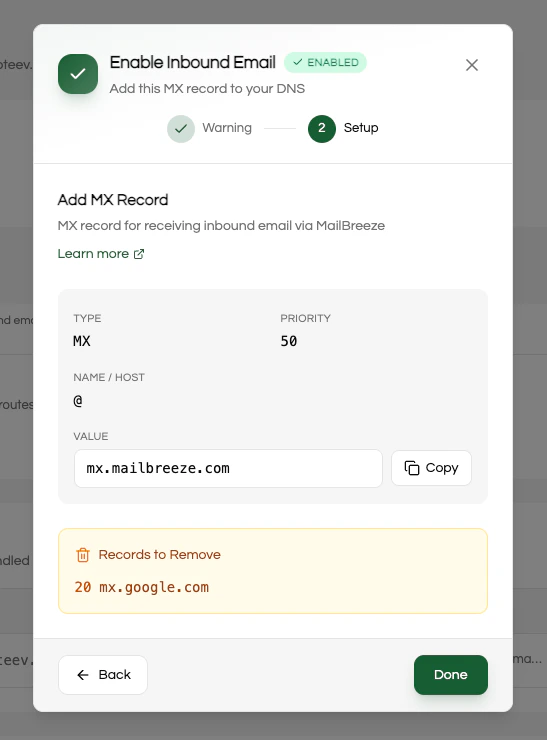 This screen shows you:
1. **The MX record to add** — This points your domain's email to MailBreeze
2. **The MX records to remove** — These are your existing records that must be deleted
### MX Record Details
| Field | Value |
| ------------------ | ---------------------------------------------------- |
| **Type** | MX |
| **Name / Host** | `@` (or leave blank, depending on your DNS provider) |
| **Value / Target** | `mx.mailbreeze.com` |
| **Priority** | `50` |
**About MX Priority**: The priority number (50) determines the order in which mail servers are tried. Lower numbers = higher priority. Since MailBreeze will be your only MX record, the exact number doesn't matter. We use 50 as a reasonable default.
### Records to Remove
The setup screen lists your existing MX records that need to be removed. Common examples:
| Provider | Records to Remove |
| ---------------- | ----------------------------------------------------- |
| Google Workspace | `aspmx.l.google.com`, `alt1.aspmx.l.google.com`, etc. |
| Microsoft 365 | `*.mail.protection.outlook.com` |
| Zoho Mail | `mx.zoho.com`, `mx2.zoho.com`, etc. |
| Fastmail | `in1-smtp.messagingengine.com`, etc. |
| ProtonMail | `mail.protonmail.ch`, `mailsec.protonmail.ch` |
**Critical**: You must remove ALL existing MX records, not just add the MailBreeze record. Having multiple MX records will cause inconsistent email delivery—some emails will go to MailBreeze, others to your old provider, unpredictably.
***
## Scenario 2: Domain Has No Existing MX Records
If your domain doesn't have any MX records (common for new domains or subdomains created specifically for MailBreeze), you'll see a simpler setup screen:
This screen shows you:
1. **The MX record to add** — This points your domain's email to MailBreeze
2. **The MX records to remove** — These are your existing records that must be deleted
### MX Record Details
| Field | Value |
| ------------------ | ---------------------------------------------------- |
| **Type** | MX |
| **Name / Host** | `@` (or leave blank, depending on your DNS provider) |
| **Value / Target** | `mx.mailbreeze.com` |
| **Priority** | `50` |
**About MX Priority**: The priority number (50) determines the order in which mail servers are tried. Lower numbers = higher priority. Since MailBreeze will be your only MX record, the exact number doesn't matter. We use 50 as a reasonable default.
### Records to Remove
The setup screen lists your existing MX records that need to be removed. Common examples:
| Provider | Records to Remove |
| ---------------- | ----------------------------------------------------- |
| Google Workspace | `aspmx.l.google.com`, `alt1.aspmx.l.google.com`, etc. |
| Microsoft 365 | `*.mail.protection.outlook.com` |
| Zoho Mail | `mx.zoho.com`, `mx2.zoho.com`, etc. |
| Fastmail | `in1-smtp.messagingengine.com`, etc. |
| ProtonMail | `mail.protonmail.ch`, `mailsec.protonmail.ch` |
**Critical**: You must remove ALL existing MX records, not just add the MailBreeze record. Having multiple MX records will cause inconsistent email delivery—some emails will go to MailBreeze, others to your old provider, unpredictably.
***
## Scenario 2: Domain Has No Existing MX Records
If your domain doesn't have any MX records (common for new domains or subdomains created specifically for MailBreeze), you'll see a simpler setup screen:
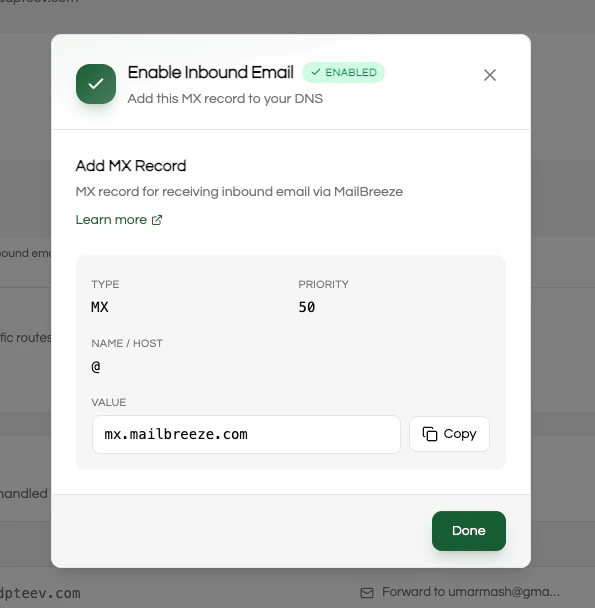 This is the ideal scenario—you can add the MailBreeze MX record without affecting any existing email service.
### MX Record Details
| Field | Value |
| ------------------ | ---------------------------------------------------- |
| **Type** | MX |
| **Name / Host** | `@` (or leave blank, depending on your DNS provider) |
| **Value / Target** | `mx.mailbreeze.com` |
| **Priority** | `50` |
***
## Add the MX Record
Log in to your DNS provider (Cloudflare, GoDaddy, Namecheap, Route 53, etc.) and navigate to the DNS management page for your domain.
If you have existing MX records (Scenario 1), delete them first:
1. Find all records with Type = **MX**
2. Delete each one
3. Wait for the changes to save
Double-check you're editing the correct domain. Accidentally removing MX records from the wrong domain will break email for that domain.
Create a new MX record with these values:
| Field | Value |
| -------------- | ---------------------------------------- |
| Type | MX |
| Name / Host | `@` (or your subdomain, e.g., `inbound`) |
| Value / Target | `mx.mailbreeze.com` |
| Priority | `50` |
| TTL | `300` (or Auto) |
1. Go to **DNS** > **Records**
2. Click **Add record**
3. Select Type: **MX**
4. Name: `@` (for root domain) or your subdomain
5. Mail server: `mx.mailbreeze.com`
6. Priority: `50`
7. Click **Save**
Note: MX records cannot be proxied in Cloudflare.
1. Go to **DNS Management**
2. Scroll to **MX Records**
3. Click **Add**
4. Host: `@` (GoDaddy auto-appends your domain)
5. Points to: `mx.mailbreeze.com`
6. Priority: `50`
7. Click **Save**
1. Go to **Advanced DNS**
2. Find the **Mail Settings** section
3. Select **Custom MX**
4. Host: `@`
5. Value: `mx.mailbreeze.com`
6. Priority: `50`
7. Click **Save All Changes**
1. Go to **Hosted zones** and select your domain
2. Click **Create record**
3. Record type: **MX**
4. Record name: Leave blank for root, or enter subdomain
5. Value: `50 mx.mailbreeze.com`
6. TTL: `300`
7. Click **Create records**
Note: Route 53 combines priority and value in one field.
1. Go to **Networking** > **Domains**
2. Select your domain
3. Click **Add Record** > **MX**
4. Hostname: `@` or subdomain
5. Mail Provider Hostname: `mx.mailbreeze.com`
6. Priority: `50`
7. Click **Create Record**
Before completing setup in MailBreeze, verify your MX record is live:
1. Go to [MXToolbox MX Lookup](https://mxtoolbox.com/MXLookup.aspx)
2. Enter your domain (e.g., `inbound.yourdomain.com`)
3. Confirm you see `mx.mailbreeze.com` with priority `50`
4. Confirm no old MX records appear
DNS propagation typically takes 5-15 minutes but can take up to 48 hours in some cases. If you just made changes, wait a few minutes before checking.
Return to the MailBreeze dashboard and click **Done**. MailBreeze will verify your MX record is correctly configured.
Once verified, inbound email is active. Any emails sent to addresses on your domain will be received by MailBreeze.
***
## After Setup
Once inbound email is enabled, you need to configure how emails are handled:
### Configure Default Route
By default, inbound emails are stored in the MailBreeze Inbox. To change this:
1. Go to **Domains** > your domain > **Inbound Settings**
2. Under **Default Route**, select:
* **Store in MailBreeze** — View emails in your dashboard
* **Forward to Email** — Enter email addresses to forward to
* **Send to Webhook** — Enter your webhook URL
### Create Address-Specific Routes
Route different addresses to different destinations:
| Address | Destination |
| ------------------------------ | --------------------------- |
| `support@yourdomain.com` | Webhook to helpdesk system |
| `sales@yourdomain.com` | Forward to sales team inbox |
| `*@yourdomain.com` (catch-all) | Store in MailBreeze |
See [Configure Routes](/inbound/routes) for detailed instructions.
### Send a Test Email
Send a test email to verify everything works:
1. From your personal email, send a message to an address on your domain
2. Check your configured destination (webhook endpoint, forwarded inbox, or MailBreeze Inbox)
3. Verify the email arrived with correct content and attachments
***
## Troubleshooting
1. **Verify MX records**: Use [MXToolbox](https://mxtoolbox.com/MXLookup.aspx) to confirm `mx.mailbreeze.com` is the only MX record
2. **Check for old records**: Ensure all previous MX records are deleted
3. **Wait for propagation**: DNS changes can take up to 48 hours
4. **Check spam settings**: If you enabled spam filtering, check the spam folder in MailBreeze
5. **Verify routes**: Ensure you have a route configured for the address
This usually means you have multiple MX records:
1. Check for duplicate MX records in your DNS
2. Remove any records not pointing to `mx.mailbreeze.com`
3. Some DNS providers have hidden "default" MX records—check thoroughly
1. **Check webhook URL**: Ensure it's HTTPS and publicly accessible
2. **Check response time**: Webhooks must respond within 30 seconds
3. **Check response code**: Return `200 OK` to acknowledge receipt
4. **View delivery logs**: Check **Domains** > **Inbound** > **Delivery Logs** for errors
Forwarded emails may be flagged by receiving providers because:
* The email was forwarded (not sent directly)
* SPF/DKIM alignment changes during forwarding
Solutions:
* Add MailBreeze's sending IPs to your allowlist
* Use webhooks instead for critical workflows
* Contact your email provider to whitelist forwarded messages
To stop receiving inbound email through MailBreeze:
1. Go to **Domains** > your domain > **Inbound Settings**
2. Click **Disable Inbound Email**
3. Remove the MailBreeze MX record from your DNS
4. Add back your original provider's MX records if needed
***
## Best Practices
**Use a subdomain** for MailBreeze inbound email (e.g., `inbound.yourdomain.com`). This keeps your primary domain's email service unaffected.
**Set up webhook retries** on your server. MailBreeze retries failed webhooks, but your application should handle duplicate deliveries gracefully.
**Monitor delivery logs** in the MailBreeze dashboard to catch issues early.
**Configure a catch-all route** to ensure no emails are lost, even if sent to unexpected addresses.
***
## Next Steps
Set up rules to route emails to different destinations
Build your webhook endpoint to process incoming emails
This is the ideal scenario—you can add the MailBreeze MX record without affecting any existing email service.
### MX Record Details
| Field | Value |
| ------------------ | ---------------------------------------------------- |
| **Type** | MX |
| **Name / Host** | `@` (or leave blank, depending on your DNS provider) |
| **Value / Target** | `mx.mailbreeze.com` |
| **Priority** | `50` |
***
## Add the MX Record
Log in to your DNS provider (Cloudflare, GoDaddy, Namecheap, Route 53, etc.) and navigate to the DNS management page for your domain.
If you have existing MX records (Scenario 1), delete them first:
1. Find all records with Type = **MX**
2. Delete each one
3. Wait for the changes to save
Double-check you're editing the correct domain. Accidentally removing MX records from the wrong domain will break email for that domain.
Create a new MX record with these values:
| Field | Value |
| -------------- | ---------------------------------------- |
| Type | MX |
| Name / Host | `@` (or your subdomain, e.g., `inbound`) |
| Value / Target | `mx.mailbreeze.com` |
| Priority | `50` |
| TTL | `300` (or Auto) |
1. Go to **DNS** > **Records**
2. Click **Add record**
3. Select Type: **MX**
4. Name: `@` (for root domain) or your subdomain
5. Mail server: `mx.mailbreeze.com`
6. Priority: `50`
7. Click **Save**
Note: MX records cannot be proxied in Cloudflare.
1. Go to **DNS Management**
2. Scroll to **MX Records**
3. Click **Add**
4. Host: `@` (GoDaddy auto-appends your domain)
5. Points to: `mx.mailbreeze.com`
6. Priority: `50`
7. Click **Save**
1. Go to **Advanced DNS**
2. Find the **Mail Settings** section
3. Select **Custom MX**
4. Host: `@`
5. Value: `mx.mailbreeze.com`
6. Priority: `50`
7. Click **Save All Changes**
1. Go to **Hosted zones** and select your domain
2. Click **Create record**
3. Record type: **MX**
4. Record name: Leave blank for root, or enter subdomain
5. Value: `50 mx.mailbreeze.com`
6. TTL: `300`
7. Click **Create records**
Note: Route 53 combines priority and value in one field.
1. Go to **Networking** > **Domains**
2. Select your domain
3. Click **Add Record** > **MX**
4. Hostname: `@` or subdomain
5. Mail Provider Hostname: `mx.mailbreeze.com`
6. Priority: `50`
7. Click **Create Record**
Before completing setup in MailBreeze, verify your MX record is live:
1. Go to [MXToolbox MX Lookup](https://mxtoolbox.com/MXLookup.aspx)
2. Enter your domain (e.g., `inbound.yourdomain.com`)
3. Confirm you see `mx.mailbreeze.com` with priority `50`
4. Confirm no old MX records appear
DNS propagation typically takes 5-15 minutes but can take up to 48 hours in some cases. If you just made changes, wait a few minutes before checking.
Return to the MailBreeze dashboard and click **Done**. MailBreeze will verify your MX record is correctly configured.
Once verified, inbound email is active. Any emails sent to addresses on your domain will be received by MailBreeze.
***
## After Setup
Once inbound email is enabled, you need to configure how emails are handled:
### Configure Default Route
By default, inbound emails are stored in the MailBreeze Inbox. To change this:
1. Go to **Domains** > your domain > **Inbound Settings**
2. Under **Default Route**, select:
* **Store in MailBreeze** — View emails in your dashboard
* **Forward to Email** — Enter email addresses to forward to
* **Send to Webhook** — Enter your webhook URL
### Create Address-Specific Routes
Route different addresses to different destinations:
| Address | Destination |
| ------------------------------ | --------------------------- |
| `support@yourdomain.com` | Webhook to helpdesk system |
| `sales@yourdomain.com` | Forward to sales team inbox |
| `*@yourdomain.com` (catch-all) | Store in MailBreeze |
See [Configure Routes](/inbound/routes) for detailed instructions.
### Send a Test Email
Send a test email to verify everything works:
1. From your personal email, send a message to an address on your domain
2. Check your configured destination (webhook endpoint, forwarded inbox, or MailBreeze Inbox)
3. Verify the email arrived with correct content and attachments
***
## Troubleshooting
1. **Verify MX records**: Use [MXToolbox](https://mxtoolbox.com/MXLookup.aspx) to confirm `mx.mailbreeze.com` is the only MX record
2. **Check for old records**: Ensure all previous MX records are deleted
3. **Wait for propagation**: DNS changes can take up to 48 hours
4. **Check spam settings**: If you enabled spam filtering, check the spam folder in MailBreeze
5. **Verify routes**: Ensure you have a route configured for the address
This usually means you have multiple MX records:
1. Check for duplicate MX records in your DNS
2. Remove any records not pointing to `mx.mailbreeze.com`
3. Some DNS providers have hidden "default" MX records—check thoroughly
1. **Check webhook URL**: Ensure it's HTTPS and publicly accessible
2. **Check response time**: Webhooks must respond within 30 seconds
3. **Check response code**: Return `200 OK` to acknowledge receipt
4. **View delivery logs**: Check **Domains** > **Inbound** > **Delivery Logs** for errors
Forwarded emails may be flagged by receiving providers because:
* The email was forwarded (not sent directly)
* SPF/DKIM alignment changes during forwarding
Solutions:
* Add MailBreeze's sending IPs to your allowlist
* Use webhooks instead for critical workflows
* Contact your email provider to whitelist forwarded messages
To stop receiving inbound email through MailBreeze:
1. Go to **Domains** > your domain > **Inbound Settings**
2. Click **Disable Inbound Email**
3. Remove the MailBreeze MX record from your DNS
4. Add back your original provider's MX records if needed
***
## Best Practices
**Use a subdomain** for MailBreeze inbound email (e.g., `inbound.yourdomain.com`). This keeps your primary domain's email service unaffected.
**Set up webhook retries** on your server. MailBreeze retries failed webhooks, but your application should handle duplicate deliveries gracefully.
**Monitor delivery logs** in the MailBreeze dashboard to catch issues early.
**Configure a catch-all route** to ensure no emails are lost, even if sent to unexpected addresses.
***
## Next Steps
Set up rules to route emails to different destinations
Build your webhook endpoint to process incoming emails